Category

Astrohaus

Kickstarter vs. Indiegogo – A Creator’s Perspective

Since we launched our most recent campaign for Traveler on Indiegogo a lot of people have asked me why we chose Indiegogo (IGG) instead of Kickstarter (KS). I thought I would detail the reasons we had for making the choice we did and some of the considerations you should have when making a decision for your own project.

  1. Agency preference – For our Traveler campaign we worked with a full service marketing agency that specialized in crowdfunding to help us create, launch, and build our campaign. While they have done campaigns on both platforms, they prefer IGG and are generally known as the premiere IGG agency. Our contact at IGG said, ‘if you have the money, they are the ones to work with.’ They have a close relationship with the IGG team and also prefer the additional marketing and advertising features that IGG has and Kickstarter doesn’t. More about this below.
  2. Our last Kickstarter campaign for Clapboss flopped and we were a little bitter. I don’t blame Kickstarter itself but I have a relationship with one of the hardware managers there and he totally dropped the ball on us. The campaign likely wouldn’t have fared much better but he had made promises to us for support but instead went radio-silent. After the fact we heard that the KS editorial team didn’t like the style of our video. Ok, well we liked it but if our contact would have let us know that when we sent him early cuts, that would have been wildly helpful and we likely would have changed our strategy. Again, the campaign had other things going against it but this experience left us looking for something different.
  3. Indiegogo support – In contrast to our experience with Kickstarter, the folks at IGG came out of the gate swinging with ways that they could help us with our campaign. Whereas Kickstarter is traditionally wary of providing even the faintest hint of a promise from their team, Indiegogo goes as far as writing a contract that details all the promotional promises they will deliver during the campaign. The IGG team and platform was not new to us either. John Vaskis, IGG’s current VP of Sales and former head of hardware, was one of the very first people we met in NYC when we were showing the Hemingwrite concept at the Engadget Expand competition in 2014. Initially, Patrick and I wrote off IGG because they were the underdog and we wanted to stick with the industry leader. That’s why we launched Hemingwrite on Kickstarter but despite that, IGG folks have stayed in touch with us and were always positive, helpful, and encouraging, never spiteful. Their persistence, good nature, and willingness to concretely say how they would help our campaign ultimately won us over. Interestingly, Julio at Kickstarter, their head of community and a friend, reached out to me when he saw our Traveler landing page wondering what he could do to get us to launch it on KS. At this point we were leaning to IGG but the decision wasn’t final. I let him know about our previous experience in very clear terms and to his credit they put together a proposal that was very impressive. I didn’t even know Kickstarter did that kind of thing. We had to seriously consider it but in the end we wanted to stick with our agency’s preference since that is why we hired them.
  4. Marketing and advertising features – Kickstarter and Indiegogo are more similar than not but the differences are quite important. The history is that IGG has been nipping at Kickstarter’s heals for years and they do everything they can to woo creators. That has resulted in a number of creator focused features that can ad up to big $$$.
    A. Facebook pixel – this is a big one. IGG lets creators put their own FB pixel on their campaign page. This allows for conversion tracking and the ability to do remarketing. I told Julio that this was our biggest single feature request of KS and supposedly it is in the works over there but he wouldn’t give me a timeline. There is just no way around the fact that every campaign over 300k relies heavily on FB advertising and without a pixel, those campaigns are much more difficult to run. If KS wants to continue to win the biggest campaign creators, they need to be able to provide as many advertising tools as possible.
    B. Secret perks – Indiegogo allows creators to create secret perks that are only available to people with a specific link. This allows for creators to offer special pricing or bundles to groups without showing the general public. You can also run sales using secret perks. In a KS campaign, all perks are public and must be made prior to launch. Indiegogo  allows you to adjust perks as you go which gives a lot of marketing flexibility. For example, you can send an email to your house list to give people a second chance to get an early bird deal even though all the public early bird deals are sold out.
    C. Multiple rewards – IGG allows backers to buy multiple rewards. It’s not as straightforward as adding multiple items to your cart like in true ecom stores but it’s better than nothing. This simplifies the perk tiers a lot and also allows for cross-sells. Kickstarter requires creators to make specific reward tiers with every combination of perks which forces people to have a very simple reward structure or on the flip side requires complicated calculators and hoops that the backer must jump through to calculate their pledge amount. From what I’ve seen in IGGs backend, it also keeps track of SKUs in addition to backer levels which I think will greatly help the nightmare that is crowdfunding campaign fulfillment.
    D. Extensions – IGG allows creators to extend their campaign. There is a hard cap on any campaign to be no longer than 60 days but an additional ending provides a second urgency period that provides a good bump to sales. Kickstarter does not allow you to extend or change the period of the campaign once it starts.
  5. Potential for flash funding and partner support – Indiegogo has relationships with Arrow and Ingram Micro on the electronics and fulfillment side respectively, and both offer some form of flash funding. We’re aren’t banking on it but there’s a chance that we could get some money from them. That would be a cherry on top. Even if we don’t get anything, those two companies are big names and maybe they could help us. 
  6. Curiosity – I’d never done an IGG campaign before and this seemed like a good time to try it out.

So we decided to give Indiegogo a shot. It wasn’t without apprehension though. Kickstarter has at least double the traffic and is without question the industry leader. Their reputation among consumers is better and the word Kickstarter is virtually genericized at this point.

It’s now November 9th. We are over 30 days into our campaign and have raised over 530k. I thought the very top end of a reasonable estimate would have been 500k when all is said and done. We beat that and there is plenty of time left! We’ll never know what the campaign would have done on Kickstarter but by any objective measure, the campaign has been a success on IGG. Both our campaign strategist and sales manager have stayed in close touch with us and have provided great support throughout including weekly catch-up calls.

So should you launch on IGG or Kickstarter? It’s hard to say. Do you have relationships at IGG or Kickstarter that you can leverage? Are you working with any agencies? You also need to consider that IGG is more lenient when it comes to the types of campaigns it allows on its platform. If you are trying to crowdfund anything related to sex, drugs, weapons, etc. IGG may be your only option. KS also has a much more creative crowd. If you are making creative tools or something artistic, Kickstarter is almost certainly the best bet. We had a unique situation that led us to IGG but for most campaigns, Kickstarter is still probably the best choice. I hate to say it since we have had such a good experience with IGG but the size of Kickstarter’s platform is very hard to beat. Even with all the hamstrung advertising features of Kickstarter campaigns, all the best digital marketers that focus on crowdfunding overwhelmingly prefer Kickstarter. That’s saying a lot. If they ever added the ability to have a FB pixel or launch secret perks, it will be that much harder for IGG to differentiate. I wish both platforms the best and hope that they continue to coexist so creators and backers have a choice.

SAAS stack for business

I was talking with a friend the other night about all of the software tools we use to run our business (Astrohaus) and how they are immensely helpful. He is the CFO of a holding company and has to manage multiple operating businesses that all use different systems, many of them not taking advantage of new software available. See below for our full ‘stack’ of paid services we use to keep our business running smoothly and with minimal interaction. If I missed something that you think would be helpful to us, please let me know!

Virtual Mailbox

Traveling Mailbox – They provide a virtual mailbox with a real mailing address. All our company mail goes there and a picture of the envelope gets uploaded to a web portal. I can decide if I want them to open and scan it, shred it, or forward it to my real address. They automatically trash any junk mail. We initially got the service because we were moving to New York and we knew it was unlikely we would be at any one office address for too long. It’s always a hassle to track down mail from previous addresses and this service provides a great solution. Never worry about missing important mail. It’s very affordable and well worth it. 

Payroll

Gusto – Pay yourself and your employees on time and correctly. It does automatic employee onboarding. The UI and UX is well thought out. The price is reasonable and it just works. All your payroll taxes are automatically paid and the reports filed. It’s easy to see what was filed on your behalf too. You can manage employees and contractors. You can even add benefits and manage them there. It also syncs with QBO without fuss. 

Employee Expense Management

Expensify – Another really great piece of software. Use the app to take pictures of receipts or forward them via email. Employees quickly create expense reports, classify expenses using QuickBooks categories, and submit them to a manager. The manager can quickly review the report, see all the attached receipts, approve the report and even reimburse employees for cash expenses directly through Expensify. Expenses are synced to QBO and journalized properly so you can push expenses to the right categories while maintaining the ability to match with a payment. A link to the expense report is added to the journal entry in QBO so you can quickly get to a receipt right in QuickBooks.

Cap Table

Carta – We don’t have a complicated cap table but Carta still provides a great service. I would highly recommend it for any company that offers equity to employees or has more than a few investors. I would also recommend it for anyone that needs to do 409A valuations because it is far cheaper than other sources. It gives you, the employer, a view into your cap table that can quickly get very confusing when tracking on your own. It also gives employees the ability to check on their vesting schedules, review agreements, and exercise options. It’s not expensive and well worth it.

Company Bills and Expenses

Bill.com – Forward invoices to bill.com and it will create vendor profiles, manage payment due dates, and provide an approval and payment process. If you have more than one person in the organization that receives bills and if you need an approval process to pay, bill.com is great. It also syncs with QBO and makes sure that invoices are easily tracked to bill payments. We actually stopped using bill.com only because I am the only one receiving bills and paying them. If my organization was just a tiny bit bigger I would sign up again.

Accounting

Quickbooks Online – When choosing small biz accounting software it’s basically QBO or Xero. We chose QBO and I’m happy with it. It keeps improving and all our other services integrate with it. I have heard good things about Xero too.

Amazon Transaction Journalizing

A2X – This was referred to us by our new bookkeepers. It pulls reports from your Amazon seller account and packages them for QBO. From what I’ve seen it’s awesome and works exactly like it should. Without this, properly booking Amazon sales is a pain and leaves a lot of opportunity for errors.

Sales Tax

Taxify – Managing sales tax receivables, payments and filings quickly becomes unwieldy even with a modest sized business. Did you know there are sales tax rates at the state, city, and county level in some places? The state of sales tax laws in our country is a disaster and not at all friendly to modern ecom businesses. That’s where Taxify comes in. You tell it where you have nexus, connect your shopping carts and it takes care of the rest (you also need to make sure your tax collection settings are correct in your shopping carts and marketplaces). Taxify quickly shows how much tax you are collecting versus your liability. It also automatically files with the relevant agencies on your behalf. 

Password Manager

LastPass – Security is important and there is no worse thing than using the same or similar passwords on every site. When a site you use has a data breach, and they will, its possible that your username and password combo will get leaked and sold. Hackers then try that same combo on every other site. Just recently I have been getting phishing emails with one of my old passwords in the subject line. The phishers got my login combo from a websites data breach and is now using it to scare me into thinking that I need to give them money, etc. That’s why you need a password manager, so you can keep track of unique passwords for every site. It also allows you to have long passwords that would otherwise be hard to remember. LastPass also works phenomenally for businesses that need to share login info. You can setup shared folders and allow certain people access to specific passwords. You can then easily manage access without emailing credentials and trying to remember who has access to what.

E-Commerce Shopping Cart

Shopify – I don’t LOVE shopify but it is very good and right now, it’s the right choice for the great majority of e-commerce companies. Magento is the devil and should be avoided at all costs. Shopify is great because the checkout flow is well designed and they are constantly improving. It is also hosted which means you get robust infrastructure and don’t need to worry about downtime. The reasons I don’t love it are that it’s easy to outgrow the base features and costs quickly start escalating. If you can get away with features in their normal plans, it is well worth it.

Email Capture

Sumo – We’ve been customers of Sumo (previously SumoMe) since day 1 at Astrohaus. Actually, even before Astrohaus we had Sumo running all of our email opt-ins on our original Hemingwrite wordpress site. Their products are what allowed us to get 9000 email addresses from all our initial traffic prior to launching the Hemingwrite Kickstarter. We’ve come a long way since then and so have they. Sumo is very powerful and still provides some of the easiest/best tools to add opt-ins to your website. 

Email Marketing and Automation

Klaviyo/Sendgrid – Both are great and I would highly recommend them. For us, email has been a major pain point for a long time since there was no perfect solution. There are three categories of emails we send: 1. broad campaigns 2. transactional emails and 3. automated emails. Campaigns are emails that go out to a list such as a newsletter. Transactional emails go to individuals such as order confirmations. Automated emails are also transactional but I’ve separated them out because they are a huge focus area for any ecom business. This is where Klaviyo shines. It allows us to do sophisticated sequences based on triggers. For example, we can send an email to a customer if they recently opened a newsletter, visited our website and then didn’t make a purchase. We can also send specific emails based on purchase behavior such as offering a cross sell if their recent order didn’t include an accessory. When we first started using Klaviyo a couple of years ago, it was a recent entrant and had a long way to go to making their email delivery reliable. These days it is great and I have no problem recommending it. The only issue is that it gets expensive if you have a large list. Klaviyo is now our largest recurring monthly expense except for rent. Ouch! It’s powerful and it works though. If you have an online business, email should be a major focus.

Helpdesk

Helpscout – I have already raved about this software in a previous post but it’s really great. We use it to manage our primary group inbox and it also powers our knowledge base at support.getfreewrite.com. It works exactly like you’d want it to. Assign conversations, write notes to other staff, respond from your email, quickly access knowledge base articles, keep track of previous conversations, and much more. They also just rolled out chat which we haven’t implemented but will soon (sorry Olark!). 

Fulfillment

Shipstation – We do most of our fulfillment through 3rd parties but the few things we fulfill from our office, Shipstation manages. If you run your own warehouse, no matter how small, Shipstation or something like it is invaluable. 

Hosting

AWS – Of course we use Amazon web services. Does any startup not? We also use some other hosting services but none worth mentioning in more detail.

We also use a variety of other hosted services on the software side of our business including Docker, Redis, Zapier, PaperTrail and Sentry, which are all invaluable. For SSL we use SSLMate and Letsencrypt. For DNS we use DNSimple.

Cloud Storage

Dropbox – In my Great Software post, I already elaborated about what makes Dropbox great. It still is and in my opinion the best cloud storage provider. It’s even great enough that we still pay for it despite already paying for Office 365 that includes OneDrive storage. However, I have a feeling that OneDrive may be worth reviewing again in the near future as a replacement for Dropbox. Dropbox is still great but Microsoft products are improving and the potential integration with the rest of the Office suite and windows could be a game changer.

Fax

Hellofax – I hate that we still pay for this but we do. I have no complaints about the product but the idea that I have to fax something in 2018 irks me. 

Phone

eVoice – We pay for a virtual phone line through eVoice. This is a new subscription for us and it works fine. Haven’t used it much but we needed to post a phone number clearly on our website to be approved as a Google Merchant.

Business apps

Office 365 – I don’t do Google apps so Office 365 is the only real option for business apps. Real Word and especially Excel are impossible for me to leave behind. We have been using Outlook which has thus far been fine but it is actually improving on a regular basis with Microsoft’s updates. 

Notable Exceptions

Slack – Technically we started using it recently because one of the agencies we are working with suggested we use it to communicate with them but its very limited. I tried to stay away from it as long as I can! I am still on the fence as to whether I think it is good or not but I think I am probably being old fashioned. One thing I definitely don’t like is how slow the app is on my desktop and phone. There is nothing more annoying than clicking on a notification only to see that the app hasn’t updated yet. Don’t send the notification if the app can’t keep up!

Inventory Management software – We run a hardware business and you’d think we’d have a better system for this but we don’t, at least not yet. We don’t have a lot of SKUs and Freewrite production batches are painfully infrequent allowing us to get by with general tools. 

Final Thoughts

All in our monthly recurring costs for services and software runs to about $2k including hosting and bookkeeping. Not bad at all considering how much value they provide. The biggest thing is giving employees the ability to self-administer as much as possible. Providing certainty that all the various administrative functions are working allows me to focus on driving sales and the rest of my team to do their job. 

Kickstarter’s a go for launch – Creating Freewrite, Part 5

The decision to create a Kickstarter campaign was made (read more in part 4). But when? And how?! We needed a deadline. We also needed to figure out how to do a Kickstarter campaign with some chance of success. Neither of us had done anything like this before! There were a huge number of decisions ahead of us, how much to set our goal at, how much to price the Hemingwrite (scary!), how to get a video made, and the list goes on.

I felt a ton of pressure to launch the Kickstarter as quickly as possible in order to keep what momentum we had at the time. If we waited too long, people would start forgetting about our little project and move on with their lives. We needed to strike while the iron was white hot.

Hemingwrite on Uncrate.com

Seeing my creation on the front page of Uncrate was one of many mindblowing experiences

And it was actually quite hot. From mid-October to mid-December we had received ~125,000 visits to our basic af WordPress website. We were converting those visitors to opt-ins and by the time we actually launched the campaign, we had over 9,000 email addresses on our list. That was all organic, unpaid, unoptimized, and earned traffic! It was super crazy watching a big press hit drive thousands of visitor to our site in a single day. There were days where we had 150 people on the homepage at one time! I had never done anything in my life that had received that much attention.

Getting this much interest was starting to cost us money!


We knew we had something on our hands. And from Patrick’s and my view, we were anxious to see if this was worth continuing to work on. At each step of the way, and even now, we have tried to maintain a very high bar for deciding whether this project is worth our time. Even though I am a bit older than he, we both fully understood that making the decision to spend our time on something is not to be taken lightly. The Hemingwrite project was just a thing we made. Could it really be something bigger? Even if we had a successful campaign, that would tie us to at least 18 months of working on the product to get it into production. It’s almost like enrolling into a graduate program with no certainty of a degree.

The press was very interested in us (and mostly complimentary), and random people on the internet were relentless in telling us their opinion. More than a few posted memes ‘throwing money at us’ and some told us the Hemingwrite signaled the end of willpower as we knew it. That’s right, the mere notion that any so-called writer would pay $$$ for a device that does less than the devices they already had in front of them was the tipping point; we were all fucked. In my view, anything that divisive deserved to be made.

Creating a successful crowdfunding campaign

Google this subject and there are endless resources to help creators with their first campaigns. There is a whole cottage industry setup to support crowdfunding. There are countless consultants, marketing agencies, and PR firms catering specifically to crowdfunding campaigns. Some of that existed in 2014 but a lot has changed in the past few years. In general, campaigns have become much larger and there are now serial creators that have become true professionals. One dirty little secret is that all the big (>$500k) campaigns nowadays are heavily reliant on paid traffic.

We had zero budget to hire any consultants and thus didn’t explore hiring any of them. We also didn’t do any paid advertising. But that’s okay and ultimately (spoiler alert) we had a successful campaign.

What are the critical aspects of a campaign? Some people say the video is the most important thing. Some people say press or getting a huge email list. In my opinion, from doing our campaign and paying very close attention to other campaigns before and since then, by far the most important things are what you are selling, how clear you are in telling people what it is, and whether it is a good fit for crowdfunding.

Here is what we had going for us:

  • Large email list of over 9k people – important note, these were very high quality leads since they opted into a page that very clearly discussed the project. They didn’t opt into a teaser or get gamed into giving us their email. Nor did we buy or rent lists. Quality is very important with leads.
  • Lots of buzz from press in the months leading up to the campaign with potential to get press coordinated on launch day – I had tons of press inbound to me leading up to the Kickstarter and I was very diligent about keeping track of them and beginning a relationship. Ultimately, I knew the goal would be to have a few major pubs agree to an embargo for launch.
  • Visually striking prototype that invokes interest and multiple conflicting emotions (old and new, minimal but slightly garish, sorta typewriter but also sorta computer, stark).
  • Holiday season – it was November and if we launched quickly, we could capture the excitement around the holidays. Even if people weren’t going to be able to receive the Hemingwrite in time for Christmas, people are generally spending a lot more money during the holidays and we could capitalize on that trend.

Scary stuff:

  • Price – Revealing the price scared us the most, and was the source of many heated conversations between Patrick and myself. We had very purposefully been quiet on what we expected the MSRP to be throughout the project and what it would be priced at on Kickstarter. It was hard too because this was the question that every single press person and interested party asked us, “how much?” We knew it would be higher than most people’s expectations. We also knew we would get A LOT of backlash no matter how aggressive we got in minimizing our margin. The most vocal people on the internet have extremely unrealistic expectations on price. Some people think that everything in China is $0.02 and thus should be free! They also compare whatever a tiny manufacture like us would make to something that Amazon makes in the millions of pieces that is in its 7th generation. Even with all the great press received and emails we collected, we were very concerned that the price we needed to set would have such a strong chilling effect that it would kill our campaign. We had no idea what would happen!
  • Video – Both Patrick and I had made videos in our past but neither of us had made a decent video in a very long time. Everyone talks about how important the video is for a campaign. I knew that hiring people to film and edit is a huge expense that we couldn’t afford. I was very unsure about how we were going to make a suitable video on a micro budget.

Writing the Kickstarter campaign copy

Patrick got started drafting the copy after reviewing some other successful campaigns. The key is to get to the point as quickly as possible by answering the question, “what is it?” Once the question is answered directly, you can unwrap the story, how it works, and who it’s for. Also critical are adding visual elements that explain various aspects of the product. We didn’t hire a graphic designer so we had to make do with my poor Illustrator and Photoshop skills.

I created some laughably amateur graphics but saved face with some decent gifs that showed the prototype working. Good gifs are really critical and these days they are stupid simple to make. I used my DSLR on rapid fire to get a series of shots that were then compiled with Photoshop into a gif. That’s the hard way. Now you can shoot a gif, edit it, and publish it right on your phone in seconds.

Patrick and I went back and forth on the copy a couple of times but that was about it. I think it took about 2 weeks from start to finish which is an extremely compressed time frame.

One pro tip: Kickstarter backers LOVE features. No, don’t add tons of features since that’s how Kickstarters fail but DO try to make as many features as possible out of the product. It’s all about presenting as many aspects of the thing as features. Get it? Get it!

Aside from the gifs and a basic graphic or two, we invested in professional product photography. It just so happens that a neighbor of mine in Detroit is a very high end product photographer and overall very awesome guy. We just walked the prototype over there and worked out a very reasonable deal to get 4-5 critical shots. I think it ended up costing about $4-500ish for the shoot. The overhead shot he took ended up being used in tons of materials from the Kickstarter to press to other marketing materials. Even though I probably could have taken usable photos with my full-frame Canon 5D Mark II, he had the studio setup and knew how to use lighting to showcase a product. He used a 50MP multi-shot Hasselblad too which was probably unnecessary but at least we knew were getting the best possible shots. Even given our budget, it was well worth the money.

Reward Tiers

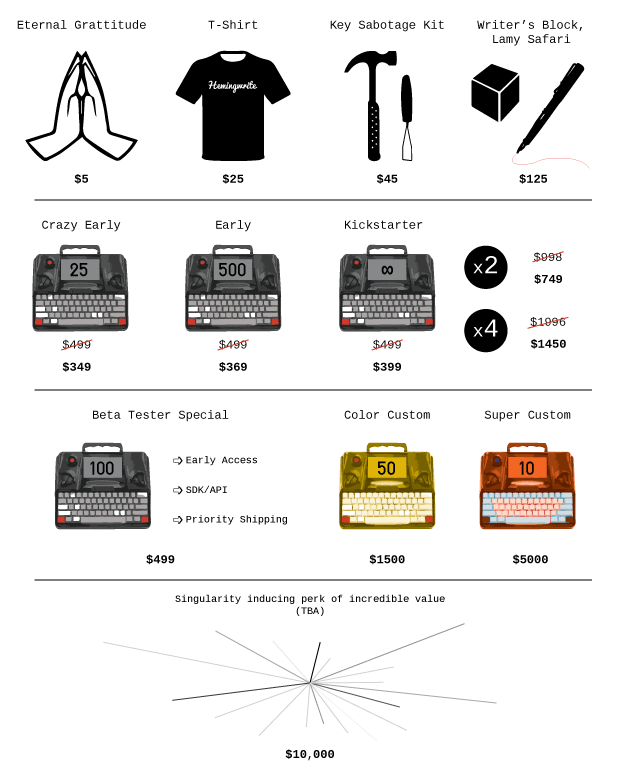
Kickstarter is not a store, that’s core to their ethos and they have made that very clear. But it sorta kinda acts like one, at least in limited circumstances (sorry KS!). As part of the campaign, we had to set reward tiers that correspond to funding thresholds. For a campaign that results in the production of a physical product, those tiers typically correspond to receiving one or more of the products. Generally, it follows this structure:

  1. $1 – $5 tier for people to just say that they support the project with a nominal amount.
  2. Swag tiers for people to get a branded thing like a t-shirt or pen.
  3.  Early bird Q1 tier that is the lowest price for a single piece of the final product. This is meant to get the campaign started with as much momentum as possible.
  4. Regular bird Q1 tier – this is the regular price for a single piece of product. The majority of a successful campaign usually has the most backers at this level.
  5. Q2 – Q10 tiers – this is for people to receive multiple pieces of product, usually at some kind of bulk discount.
  6. Fancy tiers – to capture big spenders, there are high price tiers that typically include customization or other perks like meeting the founders.

Yes, this is simplifying things a bit and some campaigns have gone to crazy lengths to workaround Kickstarter’s limitations of not being a proper store. The issue is that backers can only back at a single reward tier and they are not able to ‘add to cart’ like you would during a normal e-commerce checkout process. That means you can’t up-sell backers on accessories or allow them to choose options unless you provide a specific tier that includes exactly what they want. That’s not practical for every single permutation of product choice so it makes some reward tier structures very complicated.

We stuck to a fairly straightforward reward tier model similar to the one I outlined above and didn’t even try to add color options to the basic tiers. One thing that I really wanted to do was have a crazy ‘halo’ tier like a solid gold Hemingwrite for $500k but I quickly learned that Kickstarter limits tiers to $10k :( I even went through the exercise of calculating the cost of our housing if it was made from solid gold at market prices!

Here is the tier structure we ended up with:

We didn’t get anyone at the tiers above the Beta Testing Special which I was a little disappointed about. Actually one person had selected the Color Custom tier but then they cancelled before the campaign was over! I was really excited to make custom Freewrite’s for people. In the end, it was more than fine because making custom anything takes a ton of time. That’s why we priced the tiers so high but it still would have been a huge amount of work to fulfill them.

Fulfillment dates, Shipping, and Taxes

Suprise, these little details are monsters! When can backers expect to receive their rewards? How many countries did we want to ship to? How much would it cost at each tier to ship to each country? How much would a backer in each country have to pay in duties and taxes to receive their goods??

No matter how you cut this problem, it’s painful and extremely difficult to figure out. For most people, it is virtually impossible to forecast accurately. For starters, you need to know the precise dimensions and weight of a package in order to properly quote it for shipment around the world. All we had were best guesses!

Thankfully, I have been selling goods online for at least a decade and have good friends that are true logistics experts. Even so, it took a while to work out estimates and even with that experience, I added in some buffer to international shipping to cover our butts in case we couldn’t get better international rates than I expected.

How did we do with our estimates?

  • We correctly estimated US shipping charges but ate the upgrade to air for everyone. We ended up sending all of our US shipments via air instead of ocean/ground due to our delivery tardiness. In hindsight this would have been easy to predict. Every Kickstarter is late! Especially first-timers. May as well just assume that if you are building overseas that all rewards will ship via Air unless you are very experienced or are already in production at the time of the campaign.
  • We over budgeted European shipping charges. We ended up finding a Hong Kong based fulfillment solution that had better rates than we expected to Europe.
  • Canadian shipping was about right.
  • More international folks backed us than I had expected. The split was about 30% international and 70% domestic, with a clear concentration in English speaking countries.
  • Shipments were sent internationally as DDU resulting in customers paying VAT upon receipt. Even though we very clearly indicated that this was the case in the campaign, some people were not happy. I am not 100% sure if this was the right decision (versus DDP) but I am still leaning towards yes.

I’ll have to write another post about international hardware logistics because there is just too much to put here.

Making the Video

I was seriously dreading this part of the campaign. We needed a good video. Not just something that was entertaining but also something that properly explained the product and fit the format for a Kickstarter campaign. We watched a ton of other Kickstarter videos from other campaigns. This is the format we came up with:

  1. Say what the product is
  2. Explain the product
  3. Cut in some b-roll of people using the product
  4. Ask for support

One thing that we did not do and I am not even sure why, is introduce ourselves or talk about our background. Maybe we didn’t think anybody would care since we were first-time creators and weren’t even writers! It probably just fell off the priority list as we ran out of time.

To get our video shot and edited, Patrick contacted an old filmmaker friend of his in northern Michigan about helping us out. He liked the idea and was in! And he didn’t care much about the money, he just wanted us to throw him whatever we could. I think we ended up settling on something like $500. Deal! He had his own camera, a pro-quality but older Canon, and even a crane that we used in a coffee shop. It was pretty hilarious rolling into a local coffee shop in Traverse City with this huge camera crane. They were very accommodating and I think the guests were all excited to be part of the action.

So we made the 4 hour drive up there with the plan that we would shoot everything in one day. Even though it was a trek, our thought was that it would give us the necessary focus to get it done. We had a clear mission and we would be completely undistracted.

Once up there, we started writing the script. We probably should have done that before hand but we didn’t. In fact, our filmmaker had already wrangled some actor extras for us to use in the shoot and they were waiting for us in his apartment while we were writing the treatment!

We shot the video on XX Nov and he spent some time editing it.

On XX he sent us the first cut. I think I nearly lost my mind at that moment. It was terrible. The music was cheesy as hell. A lot of the footage was 2-3 stops too dark. I couldn’t even fathom publishing this video.

After calming down a bit, we sat down and set about trying to get something usable with the footage that we had. Yes, the first cut was bad but it was workable. It had to be because we weren’t driving back up to northern Michigan to shoot more.

We went back and forth and after another edit or two ended up with the final video you can see on Kickstarter. I still think it’s cheeseball and doesn’t show any of our style or creativity but the days of being squeamish about it are long gone. It did the necessary things of clearly showing the product and explaining what it does. That’s the most important part and I will just have to step it up for my next Kickstarter video (coming soon!).

Setting the funding threshold

The funding threshold is the amount at which our campaign becomes successful and we, as creators, receive all the money raised. If the campaign is unable to reach the threshold, the creators get zero and the campaign fails.

We landed on $250k based on some very basic projections of how many Hemingwrites we would ‘sell’ through the campaign and how much we thought was the bare minimum capital we needed to build it. The cost of each unit and the development needed to be factored in. This is the right way to do it and shouldn’t be too controversial. It’s a little tricky because estimating demand ahead of the campaign is very hard. The last thing you want to do as a creator is only get enough money to do half the development.

Wow, was I wrong! You wouldn’t have believed how many people told us to put an artificially low number  ($50k) in order to say at the end of the project ‘we met 5000% of our goal’. Unless the campaign is simply a marketing gimmick and you are already fully committed to investing the required money for development and production, setting a very low threshold is reckless and borderline unethical. I also don’t think the marketing value of saying ‘we met 5000% of our goal’ is valuable at all. So to risk the entire campaign on a valueless marketing line would be a terrible tradeoff.

Most people we talked to, including other creators, thought we were insane to put a $250k funding threshold (they thought it was so high that it would be a deterrent for backers). We understood that it was a big number but didn’t agree with lowering it. We only wanted to work on this project if we had the money to do so.

In the end, was $250k enough? Hmm, maybe but it would have been extremely stressful, at best. We raised additional funding that allowed us to build things the right way but it also cost a heck of a lot more money. Honestly, I can’t imagine doing this project on a 250k budget but maybe we could have pulled it off. It would have taken every trick in the book and then some.

Timing and launch day

Just before Thanksgiving I was invited to be on a podcast in Detroit. While chatting off air with the other guests, who had themselves recently launched a Kickstarter campaign, I let them know our plans to launch our campaign in a couple of days. “You know that you have to get your campaign approved once you submit it, right? it can take 3-5 days!” That was one of many “oh, shit” moments.

Our original plan was to launch the campaign on Black Friday 2014. It was turning out to be a perfect storm because our big feature in the WSJ on the Hemingwrite was scheduled to publish on that Saturday, i.e. 2 days after launch. It all was a little too perfect! Who launches on Black Friday and gets a huge feature in the WSJ that weekend with no PR team and zero budget?!

It didn’t happen, either thing. I got notice that they were holding the WSJ piece for another weekend. It was a good thing too because the campaign was far from ready. Oh well.

After a couple more delays, we got approval and finally went live on December 10, 2014. We were told that launching on a Tuesday around noon eastern time was the best time to launch which is what we aimed for. We missed Tuesday but Wednesday the 10th at 1pm should be fine, right?!

Scary!

It’s done! A sigh of relief. But actually this is the very beginning.

Press Embargo for Launch

We had the great benefit of having a lot of press reach out to us and cover the Hemingwrite prior to the campaign. I did a couple of outbound emails at the very beginning of the project but quit after not getting anywhere with them and getting swamped with inbounds. Sounds ridiculous but that’s what happened. There were multiple cases when I had so many reporters emailing me with questions that I couldn’t get to them all in a timely manner. And instead of not publishing, they would still publish a piece even if I didn’t respond to their email!

To maximize our launch effort, we teed up press to go out at the same time that our campaign went live. How did we do that? With an embargo and some friendly reporters.

An embargo is a well understood industry term that means a reporter will not publish anything using the information you give them until a specific date and time. There is no formal contract (in our case, at least) but I think the concept of an embargo is familiar enough and the implicit trust between source and journalist keeps everyone honest. We haven’t had any issue except for one tiny incident of a reporter breaking an embargo by accident. In that case, there was a time zone issue and they didn’t realize they were breaking the embargo and promptly took the post down.

I reached out to about 5 friendly reporters (people with which that I already had a running email chain) and simply asked if they would be interested to get early access to our launch press kit in exchange for them going on embargo.1 I think all said yes at which time I told them about the specific timing of the embargo and forwarded them the materials.

For those wondering, our press kit consisted of a press release that we drafted, pictures in various resolutions on white backgrounds and in settings. Pretty simple actually. I didn’t understand this at the time but after working with hundreds of journalists over the past couple of years, I understand the process of working with press quite a bit better. Journalists are under a ton of pressure. Constant deadlines and the push for better and more exclusive content is always on their minds. The point of the Press Kit and any outreach is to serve a story up on a silver platter while also giving the journalist some confidence that it would be interesting to their readers. There is a huge barrier between startup people and press because they don’t speak the same language and their interests are not inline. In my experience, once you have become a solid source of a story for the reporter, the barrier goes down significantly. Then it is up to us to keep the communication tight and friendly.

A hidden benefit of working with Press on an embargo is that once they agree and you send them the press kit, the clock starts ticking, loudly. Because as soon as the time comes that you said you would launch, they are publishing whether you are ready or not. So you better be ready! Of course, you could always go back to them and push the launch but aborting leaves a bad taste in everyone’s mouth.

We managed to get coverage from TechCrunch, CNET, The Verge, and Huffington Post for the launch of our Kickstarter. Once those hit, much more followed including international press from around the world.

It was as great of a launch as we could have ever dreamed of! Just months prior I had thought of a feature on TechCrunch as the holy grail and here I was setting it up at a time I dictated as a general matter of business.

Just like that, on December 10, 2014, our campaign was live and the backers came pouring in.

Footnotes

(1) I didn’t realize it at the time but a seemingly minor omission of one blogger (Nate Hoffelder otherwise known as PNG1) turned into a full-on vendetta against us that has continued to this day. He was left out because he, out of 100+ journalists that inbounded, was insolent to me via email from the very first interaction and continued to be ruder with each email. I didn’t reach out to him for our launch because he was rude and his blog wasn’t as big as the others I had lined up. We even tried to convert him back to our good side when Patrick went out of his way at CES to give him a personal demo. He pretended to be nice in-person only to return back to the shelter of the internet where he published article after article in an attempt to ruin our business and reputation. Since then he has consistently gone out of his way to find negative opinions, exaggerate them, and push them as fact. I don’t like Nate for the material impact he has done to our business but I also feel bad for him because spending that much time on negativity is no way to live life. On the positive side, we learned a very valuable lesson in that it is not worth our time to convert haters like Nate. Instead, time is much better spent finding new people which haven’t already cemented their opinions, and there are always more people.

The Path to Kickstarter – Creating Freewrite, Part 4

In the last post, Part 3, I discussed the process of building the Hemingwrite prototype. It was an arduous process made more difficult given the time and budgetary crunch. Nevertheless, we got it done and the final result was all too real. Without too much hand-waiving, it looked and felt like a real consumer electronic device. The overbuilt aluminum housing gave the device a lot of rigidity. The keyboard felt amazing and all the basic features of the device worked. You could ‘turn it on’ by pressing the red button. You could type on the amazing mechanical keyboard and the letters would magically show up on the E Ink screen. The insides and electronics stack were as far from production-ready as you get but nobody could see that, it worked!1

I am getting a little ahead of myself though. The first deadline for the Engadget hardware competition was September 26th, 2014 and on October 2nd, I was notified that we were one of the top 20 applicants! WTF?! Our submission was poor by anyone’s measure. Remember, for this first submission, we had an extremely rough prototype with jagged contours on the body and ‘gravity’ secured electronics. Our video was cobbled together in the last minutes before the submission deadline. We figured it was probably best not to question their decision too much.

As a result of us moving to the next round, a representative from Engadget sent us this huge email with a ton of information and multiple forms we needed to fill out. We needed to fill out a W9 in case we moved on to the next round and earned some prize money. We needed to tell them more about the project so that they could promote it. We needed to sign an affidavit of eligibility and release. It was a lot of stuff and the project was quickly turning into something more real. We were interacting with a very big, public corporation (technically, it’s a subsidiary but you know what I mean).

Social Voting Round

The next phase of the contest that we needed to get through was a social voting round. We had never done anything like this before but it was basically the 21st century version of  a popularity contest. Each project would be given equal exposure by Engadget and it would be up to the project creators to promote it. Each person that ‘liked’ our project would count as a vote. At the end of the contest, all the votes would be counted and the top 10 would move on to the next round.

The lack of rules or enforcement of rules should have been our first clue that this contest was not for the benefit of the contestants. I learned a big lesson through participating in this contest that I’ll touch on later.

The social voting round would last from October 8th, 2014 to October 15th, 2014. We needed to put everything into getting the word out and encouraging people to vote. At this point, Patrick and I were just messaging people we knew and one by one asking them to support us. After a lot of hustling, we heard on October 17th that we made it. WE WERE GOING TO NEW YORK!!!

New York City

Each team that made the top 10 was given a $1000 stipend to come to NYC on November 7th and demo at Engadget Expand. The contest final was one part of their Expand conference alongside other tech showcases, panels, and discussion.

Patrick and I were super pumped. This thing just kept going in the right direction, and fast!

We had only a few weeks to prepare for the show and besides the Hemingwrite prototype, we needed to have marketing materials, a small booth, and a 5 minute presentation that would be done on the stage in front of the judges. We also needed to get our demo ready for showtime. It wasn’t exactly there yet. How were we going to show a working prototype when we didn’t even know how long the batteries would last?! Yes, there were multiple batteries.

In order to save some money, Patrick and I decided to drive to NYC. It’s about 11-12 hours from Detroit which isn’t too bad and it would be a fun road trip. It was fun until I got a ticket for using a phone without a hands-free headset in the city. We were stopped at a light and I was checking a voicemail but I digress.

By driving, we were also able to take a couple other people to help out at the show. My girlfriend and her friend also came along. We piled in my mom’s old white minivan that I was driving those days and hit the road.

As most people could guess, it’s not hard to go through $1000 on basic travel expenses for two people to NYC for the weekend. We were very careful with the money and everything was accounted for. Thankfully, I have friends and family in NYC so finding a couch to sleep on was easy.

We were effectively soft launching with the opening of the social voting round so there were a few things that we needed to do. This is what I consider the absolute minimum for a highly effective launch.

  1. Basic website – when I say basic, I mean basic. Ours was a WordPress site with the stock Editor theme. It cost $0. I played with the styling to get a couple of fonts and colors I liked but that was all the development needed. It had a simple homepage with a description of the product, a couple of paragraphs on why we thought it should exist, and a couple sentences on Patrick and me.
  2. Press Kit – I had read somewhere that a launch should always have a press kit because this is where the press could find all the information they need to write about you. Seemed like a good idea to me so the second page I made on the website was a press page and on that page was a downloadable Press Kit. The actual Press Kit was a zip file which included pictures of the product at high resolution (at this point, they were actually just renders, eek), pictures of the prototype in use, and a press release. All of these materials were made by either Patrick or me. I also listed myself as the press contact with my email and phone number (Google Voice).
  3. Opt-ins – Let us not forget that the point of the website was for one thing, to capture people’s information that are interested in our idea and save that information until we had something to sell. To do that, we needed a way for people to tell us that they wanted to find out more about the project and that they wanted to ’opt-in’ to our mailing list. I setup a free MailChimp account and got Sumo up and running on our WordPress application. It takes about 5 minutes. I configured a couple of basic opt-in forms, one that comes in from the side when you scroll and another in a bar that stays at the top of the site. This gives a visitor multiple chances to decide that they want to give us their email.
  4. Robust hosting – from a lot of trial and error in my previous job, I finally had found a low cost, highly reliable hosting service that was more complicated than the typical c-panel managed service but simpler than what it would take to spool an auto-scaling EC2 instance. The service that I used and continue to use is called Cloudways and I love it. They have quickly deployable applications like WordPress that are expertly pre-configured and launch on robust Amazon or Digital Ocean infrastructure. It’s also stupid cheap for what you get. My little 1gb server that I paid <$15 a month ended up handling all kinds of crazy spikes in traffic with zero issues. It was fantastic. Patrick loves making fun of me for how much I like Cloudways’ managed hosting but I don’t care. It was one less thing for both of us to worry about! The last thing I needed was for our website to go down when we had a press hit.

The Hardware Contest

We needed to prepare a few things for our trip to New York.

  • The prototype – we brought the prototype and some spare parts to make sure that everything goes smoothly. One thing that had happened to us already was the Micro SD card accidentally coming out of the RPi while running which caused a corruption of the disk. Considering that it only took the slightest of nudges along the perimeter of the RPi board to pop out the card, this was very scary! Funny story, Patrick complained for the longest time about how annoying it is manage burning the Micro SD cards because the adapters are always getting lost and the cards are tiny until I revealed that his Surface actually had a Micro SD port built-in!
  • A display – we had our own small booth at the show for us to demo the Freewrite with passersby. The organization of the contest was a disaster which meant that they told us we had one size booth and gave us something completely different. It’s hard to argue with free but it’s really stressful coming up with a booth design in a couple of weeks and then having everything change last second! Thankfully, we ended up with just a small space to customize. I bought a wood coffee table on craigslist for $30 whose legs I removed and used as a pedestal for the Hemingwrite prototype. I also borrowed an awesome articulated halogen table spot light that we could use to put some light on the proto. The E Ink screen under direct light looks amazing and is sometimes hard to believe that it is a real screen. People always get a little freaked out when they see the ‘dummy screen’ update.
  • Marketing materials – I designed a simple 4″ x 6″ handbill that featured the Hemingwrite render on the front on glossy white with some press logos. The back was matte black with white text which described the Freewrite with some simple markdown thrown in. We had them printed at a local detroit-area printer for cheap.
  • A presentation – as what has become typical, Patrick and I cobbled together a presentation the night before and were anxiously tweaking it just before going on stage. Patrick was freaking out a bit from all the stress of keeping the prototype working during demos which didn’t help!

Bump in the road

After our presentation, the judges decided who were the top 5 finalists. We were not one of them :( That hit us pretty hard. It’s funny how quickly perspective changes. We started this project thinking nothing much would come out of it and now we were down on ourselves that we didn’t make the top 5.

Being part of this contest was very revealing to me. Mostly, I realized that it is all nonsense; it wasn’t a real contest. There are no real metrics upon which the judges were scoring. Engadget did not care about helping the contestants or providing them a platform to elevate their new product idea. They are not a VC or incubator. Maybe this is all obvious but at the beginning, it really felt as though we were entering a legit competition where there were strict rules and the winner would be decided in as objective a way as possible. In participating, I realized that the whole thing was just one of the many marketing tools Engadget was using to attract tech people for the low cost of some prize money and part of someone’s time to manage the contest. It sounds like I am bitter but actually I am super thankful for the experience because I learned not to stress about the dumb contest and instead focus on getting peripheral benefits from participating. I also now know for future ‘contests’ that they can and should be manipulated by clever social engineering.

The benefits of participating in the contest were enormous and it didn’t matter one bit that we didn’t make it into the finals. We met someone who turned out to be our first and primary angel investor. From Engadget’s extremely basic coverage, we went viral multiple times and were exposed to tens (maybe hundreds) of millions of people via various press outlets worldwide. We also were able to chat with one of our fellow contestants which led us down the path of running a Kickstarter campaign. These were all formative experiences that created our company and led us to where we are today!

Quick aside: after we found out we were not a finalist, we were all feeling a bit down. We also were wondering if it made sense to still be there. At almost the exact same moment, I got an email from a senior WSJ reporter with detailed questions about the Freewrite. That’s how fast things change! I went from dejection to elation in the time it takes to read an email. Very quickly, we stopped feeling bad about ourselves to trying to figure out the logistics of getting the prototype to the WSJ photoshoot that was requested. The Wall Street Journal wanted to feature the Freewrite in an upcoming newspaper complete with quotes and a large picture. Wooo!

To crowdfund or not to crowdfund

In the days leading up to our New York trip, we had received enough interest online that it was clear to me that we should do something with this project. There were a lot of paths forward at this point and it wasn’t clear which to take:

  • Raise money from friends and family
  • Try to raise from angels or VCs
  • Crowdfund on Kickstarter or Indiegogo
  • Run our own crowdfunding campaign through our own platform or something like Tilt

Part of the reason from the very beginning that I chose to pursue this project was that I thought it could be a good Kickstarter project. It was visually interesting, demonstrably unique, designer-y and useful for a niche audience. I also thought the mix of features would play well to the Kickstarter crowd. Raising money from friends and family felt silly for this project because of how many people were messaging us about trying to buy one. Raising money from angels or VCs sounded painful.

We thought a little bit about going on Indiegogo or running our own campaign2 but both of those seemed to be trading a marginally reduced fee for potentially a much more difficult marketing problem. I tried talking to other project creators and they all had very positive things to say about Kickstarter. The advice that tipped me was from the aforementioned conversation with another serial Kickstarter company when we were in NYC. They said that the 5% you pay to Kickstarter was the cheapest marketing money we’ll spend and that they find there are huge benefits to being on the platform. As soon as the campaign is over, pre-sales drop significantly (like 80%) and that says a lot about the value of their platform. That conversation was enough to convince me that a Kickstarter campaign was the next move.(3)

Footnotes

(1) We were so incredibly uncomfortable about revealing the insides of the Hemingwrite prototype that we would try to change batteries and do any other internal work far from the public. We would go sit in an empty corner before opening it up. It is quite funny in hindsight!

(2) At the time, the Coin card had been crowdfunding on their own and they were crushing it, from all accounts. Yet another example of early success not equaling future results!

(3) Why not Indiegogo? Kickstarter is the original and they have the best reputation of the bunch. Yes, we could have saved a little money on fees by going with Indiegogo but would we have raised as much? We’ll never know but we are happy with Kickstarter. That said, Indiegogo is super interesting and I’d love to do a campaign on their platform in the future.

Building a prototype – Creating Freewrite, Part 3

In Part 2 I discussed why and how we got to the point of moving forward with the Freewrite concept. The idea for the project was clear and both Patrick and I were committed to seeing it through to the next step, a working prototype. We wanted to create a distraction-free writing tool with a mechanical keyboard, E Ink screen, and a connection to the cloud.

The deadline for the competition was closing in fast and we needed a working prototype to show in a video for the submission.

The normal prototyping process for a new product looks something like this:

  1. Determine basic feature set by talking to potential customers and looking at similar products.
  2. Determine basic architecture of the product. This would include defining things like interface (screen, buttons, LEDs), form factor, etc.
  3. Lots of sketching.
  4. Mockups in cardboard. Get out the ole xacto knife and cut some cardboard into a design based on sketches.
  5. Refine and repeat steps 1-4.
  6. Put 1-2 designs into a CAD model with specific dimensions.
  7. 3D print variations of the design to get feel for exact size, shape, and proportions of device.
  8. Refine CAD.
  9. More 3D prints until everyone is happy with design.
  10. Make a ‘looks-like’ model that incorporates as many true materials and surface finishes as the final product would have.
  11. Merge the final ‘looks-like’ model with a ‘works-like’ model to create a finished ‘works-like’ and ‘looks-like’ prototype.

At the same time that all this is going on, there are parallel processes to develop the electronic prototype and the software prototype. Everything needs to come together at the end to form the final prototype(s).

The requirements for the prototype are relatively light compared to the finished product. It doesn’t need to robust in any way. It just needs to communicate the full product design (visual identity, interface, ergonomics, features, etc.).

All of the above steps take 6 months, at a minimum. For big companies launching a new product, it typically takes years to get to a prototype that represents a final product. Our challenge was to get to a prototype in a matter of weeks. Also there was no budget. I was in 10’s of thousands in debt and while Patrick wasn’t in the red quite so deep, he was doing freelance work on the side to pay his bills. Patrick and I were splitting the expenses for this project but I would still need to go in even more debt to build a prototype and get to the next phase, if there was to be one.

If you squinted really hard, my process looked like the above steps except with a few things missing and the rest jammed into just a couple of steps. Looking back on my archives, I did one pitiful set of drawings back in May, 2014. Then there was some googling that took the form of research. I collected images of typewriters, word processors, computers, handhelds, design objects, keyboards, and anything else I could find that looked interesting. But there were no more substantive drawings until jumping straight into CAD where I ended up doing most of my visual exploration. My first CAD models are dated august 8th, 2014.

I hadn’t done any CAD work since college (7 years prior!) which meant that I was more than a little rusty. It’s fun though and I knew where to start, by drawing something that was well defined. I started by modeling a Cherry MX keyswitch. Actually I started by looking for open source CAD models of Cherry switches and shockingly, I couldn’t find any that were suitable. Given how popular they are and how long they have been around (decades), I was surprised that the models available were either poor or in the wrong format. I went to creating my own using calipers and a MX keyswitch that I had ordered.

The overall keyboard design was loosely based off of an off-the-shelf keyboard called the Poker II. It is a 60% keyboard which means that it is 60% of the size of a full size keyboard. It lacks a ten key pad, the function key row, and arrow keys. That may seem ultra minimal, which it is, but there are even smaller keyboards, 40%ers, that drop the number row. I thought the 60% was a good choice because the general layout was well known and it had all of the essential keys needed for our software, without modifiers. We didn’t need arrow keys or home/end keys because the Freewrite’s software wouldn’t allow any cursor moving anyway. Sticking to this paradigm would require other compromises for UX, like requiring the user to perform less intuitive actions, in this case using the number keys to make selections such as a Wi-Fi network, but I liked this old-school feeling anyway. NO ARROW KEYS. The tiny designer in me also loved the 60% because it was very close to symmetrical. More on that later.

I modeled a Poker keyboard in CAD as closely as possible to make sure that the real Poker Keyboard would fit in the final fabricated housing. The keyboard also lends a lot of visual cues to the final design so I wanted to make sure it was accurate. It’s complicated with 60 keys and various key widths/profiles but getting it right informed the rest of the design.

Next was the general shape of the housing. I started with a very basic wedge and continued to refine it from there.

I am asked often why I didn’t go with a folding clamshell design like a laptop or why I didn’t make it smaller:

  1. A solid body design is much simpler. Adding a hinge would complicate the mechanics and the electronics. Snaking cables through hinges and getting the perfect hinge feel was something I didn’t want to deal with.
  2. It needed to be different than a laptop, not just in function or hardware but also in form. Why? Because everyone already has a laptop and that is what people are comparing it to. It needed an iconic design that allowed it to stand on its own.
  3. The solid body design informed the user of its purpose in a very strong way visually. If it was folding, a new set of eyes would not have understood as much about its purpose.
  4. A guiding tenet of the design was that it should be obvious and available. A clam shell is not as obvious as a solid body because it needs to be opened first. A solid body presents all the interface elements to the user right away. A solid body design is the most accessible.

From a marketing perspective, it was critical that the final product separate itself from a laptop as much as possible. The closer the design became to look or operate like a laptop, the closer it would come to being laptop, but a shittier version. Competing with Apple to make a laptop as a 4 person team is insane. It’s an unfair comparison but that’s what the average consumer wants from products they buy. Apple is the baseline fit and finish for all consumer electronics. This design thinking, to distance the Freewrite from a laptop, runs throughout the product. By separating the product from a laptop visually, it enabled it to sit in a different category in a prospective customer’s mind.

As it turns out, modeling a keyboard is not simple! We all interact with keyboards regularly and there are examples all around but the various permutations are vast. I didn’t have time to dig any deeper than required since I knew that I was going to use an off-the-shelf keyboard in the prototype anyway, i.e. I didn’t need to build my own, yet. I would just have to understand all the nuances once the product moved forward, if it moved forward.

I worked on the CAD models from mid August until mid September. In between, I sourced and modeled other components including switches, buttons, knobs, handles, screen, etc. Everything had to be modeled because I knew that I only had one, maybe two tries to get things made and to get them to fit together. Mistakes would take time and would waste materials (i.e. money).

Once I had the component placement and overall design of the housing completed, I started over. It is a lot easier to make a robust, clean (without artifacts) model when the final design is known. I also needed to put the housing through a DFM process based on the way I was intending to manufacture it.

This is where my insanity became even more pronounced. I wanted to CNC the housing out of billet aluminum. Billet is just a fancy word for ‘a big solid block’. It’s insane because generally it is considered the most technical and expensive process. It also requires a giant piece of aluminum and an even more giant machine that is capable of machining it. It also take A LOT of prep, setup, and machining time. If you’ll recall from the steps listed above, normally there are a lot more prototyping steps including drawings, mockups, and 3D prints. I didn’t have time for any of that. I also was poor. Like really poor. I had to do this thing for as few dollars a possible. As insane as it sounded, I figured it would be cheaper for me to machine a billet because,

  1. The housing was too big to print in a consumer 3D printer. I would have to send it out to a commercial printer which would cost between $500-$1000 for one print. If I messed up the design in any way, it was very hard to fix and would likely need to be reprinted.
  2. I could source a piece of billet aluminum from a friend that runs a scrap yard.
  3. I found a HAAS VF-3 CNC milling machine at a local community makerspace that I could theoretically use at my leisure for as little as $50 per month.
  4. Metal is so much cooler than 3D printed plastic. I wanted metal! I also hoped that the final product would also be metal so an AL prototype seemed more fitting. Also, metal is very durable and would survive anything we threw at the prototype.
  5. I needed a challenge and I wanted to spend time in a shop.

And a challenge I got. After I finished refining the model to make sure that I could machine it using a CNC machine, I needed to source a billet. I went to my friend’s scrap yard in Dearborn, Michigan to search for something suitable. My friend Chad, who ran the yard, thought I was insane but was happy to help. I showed up at the yard driving my mom’s old Oldsmobile Silhouette minivan and was ready to put a big chunk of aluminum in the trunk.

We scoured the yard for billets of aluminum that would be big enough for the prototype but not so big or heavy that I couldn’t get them into the car or fit them into the milling machine. It was a tall order!

The Haas VF-3 CNC Vertical Machining Center at i3Detroit is a serious machine. It is old (1990’s era) with a CRT tube but it was designed to run 24/7 in a production environment. It lacks modern niceties but it definitely doesn’t lack power or utility, especially for a hobbyist project. It has a 15hp spindle, 20 position tool changer and travels of 40” x 20” x 25”. The machine weighs 12,000lbs and has another 4000lb pallet changer attached to it. The pallet changer was donated to the makerspace with the machine which was an awesome score since they are rarely found in a model shop. A new VF-3 from HAAS starts at about $70k and the pallet changer probably added another $10k-$20k. It was super awesome to have access to this machine for such a low membership fee.

At the scrap yard, the only piece that we could find which might have worked was a gigantic offcut from a waterjet machine. The billet was about 4’ in diameter and 3.5” thick. The only problem was that it weighed 361lbs. It was too big! I paid a guy at the yard $20 on the side to have him cut it in half for me. They only had a gas powered chop saw so it was well worth my $20! That was not something I wanted to do. Once cut in half, each piece was a more manageable 180lbs. At that weight, two of us could lift it up and put it in the van. Once I got it back to my shop, I cut it in half once more (now I had two quarters of a circle) on my big band saw. I was just barely able to reach the centerline with my 20” Powermatic. Cutting 3.5” thick aluminum on a vertical bandsaw was just the beginning of the fun! Did I mention that I paid just a little more than scrap rate for the aluminum? Even with all the extra aluminum I got, it was still crazy cheap. Was it worth it? Probably not but whatever. Buying a properly sized billet from a metal supply would have been more money but it would have made my life a lot easier machining it! I learned a lot in the process. (1)

I finally had the aluminum and located a milling machine that could process it. The next problem was getting access to the machine. I could join the makerspace without much trouble but they don’t just let you jump on a giant milling machine straight away. Yes, I had some experience and am a quick learner but the machine is dangerous and a lot of damage could be done to the operator and the machine if not operated properly.

After some convincing, the manager of the CNC zone at i3 allowed me to use the machine. He reacquainted me with the esoteric controls of the HAAS machine and I started to commit the process to memory. I find the HAAS control system extremely unintuitive yet it is generally considered one of the most user-friendly CNC controls on the market. There is a lot of room for error in setting up the machine and configuring the tools/work. Error, in this case, could mean a broken tool, the spindle hitting a clamp or the vise, an imperfect part, etc. Almost always the error is catastrophic with the exception of breaking a tool.

The worst part about using a vintage CNC machine was that it was designed to have programs loaded via floppy disk. Even worse, its onboard memory was tiny. For most programs it wasn’t too much of a limitation because G-Code is very lightweight. One can do many complex operations using less than 100 lines of simple text. However, 3D surfacing a large part was a completely different story. My program had tens of thousands of lines. This presented an issue because the whole program was too big to load onto the HAAS’es onboard memory. There was a solution though. I could stream the program into a buffer onboard by using a serial cable via RS-232. There was a special software that I could run on my laptop which would stream the G-Code through a USB to Serial converter into the HAAS machine. In theory, it worked fine. In practice, it was frustrating as hell. It took a while to figure out how to get the two machines from different decades to talk to each other. Remember how to set baud rates and error checking bits? Me neither.  Once I got that going, there was an additional problem in that the line numbers could only go up to 10000, IIRC. Even after I got everything working, it was not very reliable. The only reliable thing was that the program would stall in the middle for some unknown reason. This is where it got super painful. There is no good way to start a CNC program in the middle. So the options were to either start the machine from the beginning and cut a lot of air (the metal was already gone from the previous operation) OR modify the program by hand to have it start just before where it stopped spontaneously. Both options were used with varying effect. In some cases, the program could be hours long meaning that if a glitch occurred toward the end, starting over would require that same number of hours of cutting air to get back to the same spot. I could increase the feedrate to 200% but even so there was still a lot of wasted time. And if I didn’t catch the machine to lower the feedrate back to normal before it was about to cut metal again, my tool would surely break as soon as it touched the piece which meant starting all over again.

Machining this large part with contoured surfaces required many machining operations and using many different tools from 3″ dia shell mills to twist drills to 1/32″ end mills. Prior to machining this housing I had only done 2.5D milling, mostly on Bridgeport style machines. I had to reacquaint myself with speeds/feeds and also learn about the various 3D milling strategies in a brand new CAM software. It was a very steep learning curve. These software tools try to be user-friendly but are truly only user-friendly to operators that are extremely proficient. I was a beginner and attempting to machine a very large, complicated part on my first try.

One of the logistical challenges with any machining operation is ‘workholding’ i.e. holding the metal down during the machining process. There are huge forces on the material while machining and if the work is not held to the machine properly, it will shift or if it comes loose, launch at high speed in a random direction. Use too many clamps or tighten the vise too much and they will get in the way of machining or deform the material.

The housing was machined in two different fixtures because it needed both the inside and the outside machined. This was accomplished by first machining the inside which included tapped holes for screws and reamed holes for guide pins. The partially machined billet was then flipped over and fastened to a fixture plate that I made which very accurately registered the billet based on the guide pins. My program would then use a coordinate system based on the known location of the guide pins and edge of the fixture plate. This is imperative because the machine is dumb and does not implicitly know what the part looks like. It just moves based on distances within a Cartesian coordinate system with no regard to the tool or part loaded in the machine. Yes, it calculates offsets but the operator needs to program them into the machine during setup. [Am I deep enough into the weeds for you, dear reader?]

If I did it all correctly, the resulting part would be exactly like the CNC model on the computer. In reality, it just needed to be close enough for our purposes.

My first attempt was good for a first attempt but not very good as a show piece. There was no time though and we were down to the wire. Our video of a working prototype needed to be posted by 11:59pm. It was 11:55pm and Patrick was waiting for me to take the part out of the CNC machine so that we could take a quick video and upload it as part of our submission. It was really that close.

I finally relented his call, stopped the machine, and pulled the partially finished housing out. It didn’t have any finishing passes on the contouring so the surfaces still had steps and were all jagged. I quickly washed and dried it and shoved all of the electronic parts into it. I didn’t even have time to take out the guide pins so they were left in the part while we took a quick video. We had to prop up the housing on some pieces of flat metal because of the guide pins sticking out the bottom.

After we shoved the electronics into the metal housing, it sorta, kinda looked like the thing we set out to make. It had a keyboard, an E Ink screen and thanks to Patrick, it printed typed messages to the screen. If you blurred your eyes, it was a working prototype.

Once we sent in the application at 11:59pm, we cleaned up and left the shop. I was virtually sleeping at the shop the past couple of weeks trying to get this thing made and I was in desperate need of some rest. Then we waited.

It wasn’t long before we were notified that we made it to the social voting round! That gave us a good chuckle. We submitted an abysmal application and we made it to the next round!! Honestly, I thought we had no chance. In hindsight, I think our luck came from the fact that the competition was very poorly marketed despite it being Engadget running it. They had a lack of applicants which means we made the cut. We’ll take it!

I went back to finishing the prototype that weekend. The finish passes on the contouring were looking ok and it was becoming smooth. And then I fucked up, big time. During one of those random CNC serial glitches I attempted to modify the G-Code by hand and made a big mistake. A 3/4″ end mill went through the back of my beautiful housing!! I hit stop on the machine and started laughing. It was so tragic it was hilarious.

I could fix it though. Let me rephrase, it could be fixed with the right skills and equipment. Fixing it properly would require me to make a patch that was slightly proud of the neighboring surface and then weld it into the hole. Then I could make a new program to machine that area so that it blended in. The only challenge was that I had only welded aluminum once. Also, welding aluminum is much more difficult than welding steel. I did have a TIG welder I could use but I didn’t have the right filler, tungsten, or gas. It was also a bit of a tricky weld because the patch was thin and the rest of the part was very large. Aluminum is an extremely good heat conductor which means that the big piece acts like a giant heat sink pulling the heat away from the weld location disproportionately. My first attempt at welding wasn’t bad but then the weld cracked when it cooled :( I scratched my head and did a lot of Googling and YouTubing. I don’t remember exactly what I did but eventually the weld came out satisfactory. After cleaning it up on the mill, it looked good! Note, the CNC zone warden (the guy who managed the CNC area at the makerspace) thought I was 1. totally dead in the water and 2. insane to even try fixing it. Good thing I didn’t scrap it!

That prototype, affectionately called v0.1, was okay for a few pics but it was not good enough for primetime. I learned a lot though and was ready to try again. This time I was much better prepared. I still had the second quarter of my giant billet remaining from the scrap yard.

Round 2! I got the final piece of aluminum prepared, refined my machining toolpaths and went to work building another housing. It went much faster this time and the resulting part was sexy as hell. On v0.1 I noticed that the toolpaths from the ball end mill made an interesting ‘woven’ surface finish. For v1.0, I rotated the final surfacing toolpaths 45 degrees and the resulting surface finish was a super cool pattern that caught the light in an awesome way.

There were no major screwups but there was one minor glitch that nobody would ever notice except for me. My fixture plate moved a little (it wasn’t clamped down enough) while machining the top which made the wall thickness uneven around the part. This is why I spec’ed my wall thicknesses thicker than they needed to be!

The second housing, v1.0, was finished and then anodized black by a local shop. This black beauty became our workhorse for a long time even though it was a prototype.

The final prototype served us very well as we paraded it around to journalists and potential customers. I was very happy with it but every time someone would see it in person and ask if the housing was 3D-printed, a little part of me died inside. This happened far too often! At least I knew it was billet aluminum, lol.

The majority of this post was focused on the metal housing but that is not the whole story. I also machined a handle assembly that was installed in v1.0. There were switches sourced from surplus catalogs, and selector knobs and custom keycaps made via 3D printer. I trimmed the housing of the Poker keyboard to make clearance for the fat space bar I designed and I put some holes in the side to allow the whole keyboard to be mounted in the aluminum housing. The bottom was the last thing I thought about but it needed a bottom! Actually, I REALLY wanted to make the Hemingwrite without a bottom. It wasn’t reasonable for the prototype though so I quickly laser cut a bottom out of fiberboard and used the same bolt holes in the housing that I used for fixturing to secure the bottom to the housing.

The electronics running the prototype included a small router, a hacked e-reader, a Raspberry Pi, external USB battery, 2x Wi-Fi NICs, and some breakout boards. One day Patrick will write the blog post on how he made it all work. It was quite the feat!

[img_gallery id=”1995″ type=”fancybox” layout=”3″ orderby=”” order=”” description=”” ]

The good stuff sticks – Creating Freewrite, Part 2

In the last post, I told the origin story of the idea for Freewrite. At the time, it wasn’t called Freewrite; it wasn’t even called Hemingwrite. It was just an idea.

Time went by, as it tends to do. From February until July of 2014, Patrick and I both sat on it. I wrote down the idea on my Projects List in Evernote and continued working on SunDaily.

But the good stuff sticks.(1)(A) This idea for a distraction-free hardware thing churned around in my mind despite my energy being spent elsewhere.

To set the scene, in Jan 2014 I had just recruited an old friend and former roommate of mine to join me at SunDaily. The rest of my small team had dissolved by that point so it was just down to the two of us. We had some good months. April of 2014 was our best with a whopping $3300 in vitamin sales. Jim was hitting the road and selling at gyms and chiropractor offices in the Metro Detroit area. We were sharing a car (my mother’s 10-year-old minivan) since I wasn’t paying him enough to get his own. It was insane but we were desperately trying to make things work. There were sparks of excitement and a lot of prospects for growth but ultimately we knew we were basically out of time (i.e. money).

At about the same time, Jim was desperately needed on the west coast for family matters. Recruiting Jim was my last-ditch effort to get SunDaily to break out so when Jim left, I finally had a very clear signal that SunDaily’s time was up.(2) I had struggled enough for the previous two years by myself that I had no interest doing that again. I had put tens of thousands of my own hard-earned savings and years of my life into SunDaily but it wasn’t even a hard decision at that point. I was burnt out, very broke, and I knew that I desperately needed a break. I also had given it all I could. My 28th year of life, the summer of 2013 (the start of Bizdumb) until the summer of 2014, was my most stressful, by far. It handily beats out any year I spent at MIT or on Wall Street, recession and all. That year was terrible and I frequently think about it as a place I never want to be in again.

Once Jim made the decision to leave, I took a really deep breath. It was probably my first deep breath since April 2013 when I started selling. After spending so much time staring at a computer, I remember thinking that I needed to do something with my hands again that didn’t involve juggling a business.

It was then that I started thinking much more seriously about this project that Patrick and I had talked about some months ago. In my mind it had legs. I really liked it.

The idea was starting to take shape too. I had a basic industrial design in my head that was visually interesting. The primary components were already spec’ed. Patrick could cobble together a software prototype on an E Ink screen using a hacked e-reader (I hoped). I could integrate an off-the-shelf 60% mechanical keyboard into a housing that would hold all the components. Most importantly, I thought other people would find it interesting once we showed it to them. Whether they would buy it or not was unimportant to me at the time. All I really wanted to do was get back in the workshop and work on something interesting.

Lastly, if it got some interest, I thought it would be a perfect candidate to put on Kickstarter. Since crowdfunding came across my radar some years ago, a seed was planted in my head that I wanted to run a campaign one day. But I couldn’t just put up any idea on Kickstarter and expect it to sell. The format of Kickstarter and their users are not amenable to just anything. SunDaily was a terrible candidate. My other ideas up to that point didn’t quite fit either. But this distraction-free thing could be perfect. It was a real product that people could touch and feel. It was unique both visually and philosophically. It had elements of nostalgia while at the same time was very techy/progressive. It could work if we did it right.

Patrick was my next challenge. This project was not happening without him. I had no interest in going back to working alone. I was fine doing my pieces of the project by myself but I needed somebody else to have true ownership, it couldn’t just be me. Plus, Patrick and I had very complementary skillsets. We also both saw very eye to eye on the overall product design. Truthfully, I had never met anybody that had the same opinions on product design, let alone someone who also brought hard engineering skills. It was a match! But he wasn’t onboard right away. He was living his own life and working on Gridpar.

It was all a little too serendipitous. At just about the same time, Patrick’s business partner left to go back to graduate school on the west coast leaving him at crossroads as well. I continued to pepper his inbox with various thoughts and ideas about the project.

At some point during the summer, Patrick and I sat down to have the talk, “do you want to work on this thing?” I did and he did too. But how? Both of us agreed that we needed a deadline or else it would be one of those never-ending projects that we did in our mythical spare time. A little searching the internet found us a hardware competition called Insert Coin that was sponsored by Engadget. The deadline for applications, which required a video of a working prototype, was Sept 26, 2014. We had approximately 3 months to get our shit together. We agreed and parted. (Insert Coin Contest Page)

A solid month went by. Patrick and I met up again to have another talk. “Are we really going to do this thing?” I was as motivated as ever. Patrick was still interested. I figured we needed to go all in the next two months or this thing wasn’t happening. He agreed. After that, everything ramped up extremely quickly. We needed to build a working prototype in record time with a micro budget.

Specimens

July 14, 2014 email to Patrick

(A) On July 14, 2014 I wrote this email to Patrick revealing some of my excitement about the project (and a hint to both of our future names).

Footnotes

(1) I could make an argument that this concept is so powerful that it is detrimental to keep a list at all! The advice would be to only work on things that are truly memorable. If it is memorable to you, it is much more likely to be memorable with someone else. Likewise, if the idea is not memorable to you, it would be hard to expect it to be any different to an outsider. I try to use the passage of time as a tool by letting the mediocre ideas whither and the best ideas rise above.

(2) Knowing when to quit is one of the hardest things I have experienced as an entrepreneur. I hope to write a future post to elaborate.

The Freewrite is not a typewriter – Creating Freewrite, Part 1

The story starts at the end of winter, 2014. Patrick and I were both working in the Bizdom office space in Downtown Detroit, doing our best to get our startups off the ground. Patrick was building Gridpar and I was hammering away at my nutrition startup, SunDaily. We had both been through a very traumatic experience in the Bizdom accelerator program but continued working in their office for a few months after it was officially over.

It was only happenstance that Patrick and I sat near each other. I had a friend that worked for Bizdom before coming into the program and he strategically set the seating chart such that I was near him as was another person he liked, in this case, Patrick. It was me, Patrick, and Brian in one end of the room sitting across and next to each other. We kept our days interesting by talking about all kinds of random topics, primarily to take our minds away from the stress that was our startups.

Patrick has since become one of my best conversation partners but at that time I was far too entrenched (i.e. stressed) on my startup to allow myself much time to chat across the desk.(A) Even so, some discussions slipped past my focus. One of them was about writing. This was probably in February 2014 but I don’t remember exactly. I know that we got kicked out of the office approximately 6 months after the start of the program (Sept 2013) so it had to be sometime between Jan and early march.

The discussion that led to the Freewrite started simple enough. Patrick was telling me about a piece of software that he used while journalling and essay writing. I was intrigued because I found the fact that he journaled and wrote essays interesting but also for one peculiarity of the aforementioned software: it disabled the backspace key. ‘Ridiculous! That seems awfully masochistic. Why would you do that to yourself?’ I was the first skeptic.

The conversation continued on and I tried to keep an open mind. He explained to me how he is his own worst enemy while writing and by removing the ability to backspace, it pushed him forward. Drafting first and then editing later was a well-established method for writing and is often taught in MFA programs. Huh, that is interesting!

I couldn’t help but think about my own challenges with writing growing up. Everyone has to write while in grade school and I was no different. But I did always struggle and I never quite pinpointed my finger on why that was. One theory that I came up with well after college was what I call vertical vs horizontal thinking. I am a horizontal thinker and thus have a tendency to get pulled into elaboration and clarification for the perceived benefit of completeness. Whereas, vertical thinkers do not get mired in details when they are not critical to the story. The more I read good stories, the more I recognize the value of vertical narrative development. As a reader, I have more tolerance for horizontal divergence but even I can see my interest waning in these cases.

But I digress (see what I mean), Patrick introduced me a to a completely new concept in writing, this write first, edit later methodology. It’s like living your whole life trying to set nails with a log and then someone handing you a hammer. I often wonder what my relationship with writing would be if I was taught from the beginning to write first and then edit later.

During that first discussion, I learned that there are many different programs that modern writers use to help them stay focused. The software Patrick used was only one variety. There was another called ‘Write or die’ that would start deleting words if the writer paused for too long. There are many like iA Writer and Ommwriter that try to provide a pleasing writing canvas with a curated blend of fonts, desktop, and even music. The overarching concept was that the design of these environments affected the writer enough such that writers preferred them over Word to get work done. If each element of the experience was carefully thought about, the writer could get into a flow state quicker AND stay there. Distractions were the enemy, whether they were edits or email notifications or displeasing fonts, each piece of software had a method for smoothing the experience. There was a lot of room for optimization and the prevalence of these apps revealed that to me.

Just knowing that there were all these different types of software out there and that so many writers were using them was enough for my brain to start thinking creatively. ‘What if we created a piece of hardware that takes the distraction-free concept even further?’ That’s what I thought about ~20 minutes into the conversation. That may seem like a big jump to make but that’s how my brain works as a person that likes to make physical things.

In that very first conversation, we had established the vision for the eventual product. It would have a mechanical keyboard, E Ink screen, and would save all your drafts seamlessly to the cloud with Wi-Fi. The software would be pared down to a very basic writing experience. The device would turn on instantly and there would be no browser or ‘software’ to open/close.

How did I know these features would be the right choices without research or customer testing or more knowledge into supply chain? Let’s take them one at a time.

Mechanical keyboard – At some point previous to the conversation I had become aware of the mechanical keyboard community on Reddit. They are an incredibly passionate group of people, mostly gamers, that buy and customize mechanical keyboards costing between $125 and $300. Since I was never a gamer, I looked on as a curious observer. In the forums they talked about how pleasing it was to use a mechanical keyboard because of the tactile feedback, the amount of travel in the keys, and how reliable the keyboards were. Once familiar, a typist could fly across a mechanical keyboard with more precision and comfort.

I vaguely remembered what it was like to type on an older desktop keyboard and I also knew the difference a high-quality keyboard can make, in general, through my experience with Thinkpads. My first laptop was a Thinkpad and even though it was a laptop, the keyboard was so good that it actually reminded me of its awesomeness every single time I used it. Even now I am typing on a ThinkPad keyboard connected to my desktop! Writers, even more than gamers, are entirely dependent on their keyboards. They deserve the best possible typing experience. A side benefit is that a mechanical keyboard is visually interesting compared to all the laptops and external keyboards that modern writers are currently using. Maybe we could facilitate bringing mechanical keyboards, for which there was always an incredible community of gamers, into the mainstream for writers. The fact that these keyboards were legitimately better in virtually every way was nearly universally accepted. The downsides are the cost (greater than 10x a traditional membrane keyboard) and potentially, size. For this concept, it absolutely needed the best possible keyboard for writing and that meant a mechanical keyboard.

Screen – After the keyboard, the second most interacted with element of the device is the screen. Both Patrick and I love the Kindle from Amazon and first-hand know the experience that comes with an E Ink screen. Looking at text on an E Ink screen is significantly more pleasing and less straining than on a traditional LCD. What the Kindle did for reading, we could do for writing. Similar to the requirements of an e-reader, we wanted to facilitate writing anywhere, indoors or outdoors, and at any time. The E Ink screen is a step change above LCDs when it comes to readability in all environments. It’s no competition with other technologies. E Ink was the clear choice.

In practice, there were some things that we were worried about. We had never seen an E Ink display pushed to refresh as quickly as possible and thus had no idea how it would look/feel when we are trying to use it as a writing display. E-readers have a different requirement because page turning is intermittent and the user doesn’t mind waiting 500ms. Writers expect their words to show up on the display immediately and we knew that was not an option with E Ink displays. It is generally considered that a refresh rate of at least 60hz is required to show ‘instantaneous’ updates. We didn’t even know the exact refresh rate limit for E Ink but our best guess from what we read online was something like 1-10hz. Even at it’s fastest, it would be 1/6th of the speed needed to show no lag. Would that be good enough? We didn’t know but I was confident that the known benefits outweighed the potential downsides. When spec’ing the screen, we also had to contend with increased cost, lack of available information on driving the display, limited hardware support, oh and one more thing, the MOQ (minimum order quantity) was 1 million displays. There were challenges but that didn’t stop us from knowing that E Ink was the best choice.

Cloud syncing – This was a no-brainer. Again, both Patrick’s and my own experience with Dropbox showed us the light on the power of the cloud. Dropbox is by far the best cloud service, by the way. I transitioned completely to the cloud such that I could drop my laptop in the trash and not worry a minute about having all my files where I need them. They are accessible on all my computers and mobile and I just don’t worry anymore about moving files from computer to computer or syncing. Backups are a thing of the past and good riddance! But I know not everybody is as technology-forward. For the modern writer, many are still managing USB keys or risking their documents on unbacked-up computers. SCARY! We can fix that and more by incorporating a robust cloud service that is constantly saving locally and syncing to the cloud. Even better, it can integrate with Dropbox and sync files there at the same time. This is a game changer and in practice, is quite strange for how simple it feels.

In high school I had a Dymo label stuck to the bezel of my computer monitor that said ‘Save Now!’ because I had so many experiences losing work or having to work from recovered documents. To hell with Word! Pressing ctrl-s as frequently as possible became a force of habit. That’s no longer needed. In fact, nothing is needed. If you can see the writing on the display, it is saved. There is something truly powerful about this. And the fact that it is simultaneously saved to the cloud as long as you are connected to the internet is game changing. The idea is that a writer can draft on the device and swivel his/her chair to the computer and continue working straight away, no manual saving or syncing required. With Dropbox, the draft is already there waiting for editing, publishing, etc. Every element of worry, doubt, and general friction in the process that we can remove is a win for the writer.

That’s it. All of the core components of the Freewrite were chosen during the very first conversation when the concept was ideated.

What I hope is also apparent is that the origin had nothing to do with typewriters. In no way did we want to create a modern typewriter or recreate the typewriter. Typewriters are terrible! We made the decision at some point to call the Freewrite a ‘smart typewriter’ but I am still on the fence as to whether that was a net positive idea. The one thing that I find funny is that people will come to us with a feature request and try to make an argument for it based on the fact that typewriters could do it. Sorry friend, it doesn’t matter if a typewriter could do it or a word processor could do it or a pencil could do it. The only features that made it into the Freewrite or would ever be added to the Freewrite are those that can stand on their merits alone while at the same time holistically improving the experience for the user.

-Adam

Written on Sprinter


Specimens

2013-10-09 First Hangout with Patrick Paul

A. This is the very first recorded chat between Patrick and I, and it is absolutely hysterical to me. Patrick sends me an article on Medium titled Bitcoin, Energy and the Future of Money and I immediately respond ‘Go away’. Note that it was after 8 pm on a Wednesday and I can almost guarantee that I was itching to get out of the office while Patrick couldn’t help himself but send me an article as a continuation of the lengthy discussion we just had about monetary policy and joule based currencies. This epitomizes a lot of our relationship in that we both love chatting about esoteric subjects and we both can be relentless in our views!

How to get a job at Astrohaus

Hello all current and future applicants, I am going to make this really easy. Here is how to get a job at Astrohaus:

Find this post

If you find this post, that means that you have at least Googled me and clicked around my website. It astounds me how little googling people do before coming to the interview.

Write an intro

A generic intro is better than no intro. A specific intro is, of course, the best. I know a lot of job seekers are following the spray and pray method but the best people know what they want and then pursue the best opportunities for them aggressively. There is no question that writing a quick note to give me an idea of ‘why you are interested in this role’ shows that you are more interested in it than most people. Interest tells me a lot about a person.  If you don’t have highly relevant experience, tell me exactly why you think you could still be a good fit. Even if you do have relevant experience, tell me how your successes would translate to even bigger successes working with Astrohaus.

Have a great resume and portfolio

Thankfully, candidates in NYC that I have seen rarely have terrible resumes or portfolios. However, there are some things that I frequently see that are not doing candidates any favors. If you are any kind of designer, you should have a visually pleasing resume. I would vote against over designing the resume to the point it looks like a cartoon or movie poster or something crazy (this would be fine if that is the job you are applying for but not for us). Just make a normal resume but put extra care into typography and a simple color palette. If I am hiring a designer and their resume is bland or has terrible style, that’s no bueno. All designers should have a portfolio online and it should be listed as prominently as possible on a resume and everywhere else you are marketing yourself. Don’t make me work to find it. Most importantly, only put the projects that you are very proud of in your portfolio. Sure, I will mentally note if something was a school project or whatever but why make me do that? Just put your best stuff online. I would hire a designer with one incredible masterpiece (note relevance of etymology) over another that had a big portfolio of mixed quality.

All non-designers should have a nicely formatted resume but nothing more than that. Just stick to something traditional. Most importantly, do not include any jobs/roles that you are not proud of. I would have thought this was obvious but I think some other resume coaches make it seem that it is worse to have a gap in your resume. This is terrible advice. A gap wont come up until an interview (if ever) and at that point you can at least explain it. If you put some lame job on your resume, I will probably question your judgement and never even give the interview.

Research

The more research you do, the more valuable our conversation can be. If I have to explain the product to you during an interview, that’s not a good sign. If you don’t find our Kickstarter (even though it was under a different name) you are not going to mesh well with our organization. The more you know about the product and can accurately deduce from the diverse information and misinformation on the web, the more impressed I will be. Sometimes I think candidates are slightly bashful about revealing how much they ‘stalked’ the product or me. Don’t be bashful about showing how much prep you put into the interview!

Be honest

Always. This includes questions that you may not think are important or you may not feel 100% comfortable answering. For example, if I ask you if you are a dog person or a cat person, don’t be afraid to say which. If you don’t know the answer to a question, think about it, then say that you don’t know. The way someone tells me that they don’t know something says a lot about their character.

Use jargon in the interview

I want to hire the smartest people I can find. The smartest people can’t help themselves from using jargon because they are experts in their field and no other words are suitable other than the actual words that people use within that field. If you don’t use jargon in the interview, I will assume you are not sufficiently technical or embedded. I don’t mean you should use a lot of buzzwords. There is a difference! Using buzzwords will likely have the opposite effect.

Write stuff down

You don’t have to take notes on everything but if I bring something up in the interview which is related to your role or area of expertise, write it down. Show me that you are interested in the subject matter and you are curious enough to check it out later.

Email me after the interview

Thank you notes are fine but what I am really looking for is a follow-up to something that we discussed in the interview. Something in our conversation should have got your wheels turning and inspired more thought.

Be persistent

Do not harass me or the other employees. Do follow up multiple times if you haven’t heard anything. Persistence is a rare quality that I value. If you really want the job (or anything) persistence always pays off.

Bonus points

Knowing more than your role

It’s great when candidates are knowledgeable about the full machine they work within, not just their part. It doesn’t matter if you are a marketer or a designer, you should know the some high level stuff about your current company like number of employees, revenue, users, etc.

Having clear stories

Having a clear story about how you made an impact at your current role or in a previous role is very helpful. Numbers are good too. Know a few!

Overall

I want to hire the smartest, most passionate, curious people that I can find. Everything you do and say should be aimed at encouraging me to think that you are one of these people.